


Yes. The top of a vanity is a separate component that sits on the cabinet, usually held with a bead of silicone rather than fasteners, so it can be removed and replaced without disturbing the cabinet below. The work is: shut off the water, disconnect the faucet and drain, cut the caulk line at the wall and between the top and the cabinet, lift the old top off, then set and re-plumb the new one. The part that catches people out is measurement — a replacement top has to match the cabinet's footprint and the faucet hole spacing, and neither is standard across manufacturers.
- Replacing just the top is a real, common job — the top is a separate part, bedded in silicone, not built into the cabinet.
- Measure the cabinet, not the old top. Old tops get replaced with the wrong overhang all the time. Measure the cabinet box, then add the overhang the new top specifies.
- Faucet hole spacing is the second measurement — single-hole, 4" centreset and 8" widespread are not interchangeable, and a pre-drilled top locks you into one.
- Quartz is the low-maintenance default in a bathroom. Non-porous, no sealing, and unbothered by the acidic products that etch marble.
- Marble is the highest-risk surface in the house for a bathroom. Toothpaste, mouthwash and many cleaners are acidic, and acid etches marble permanently.
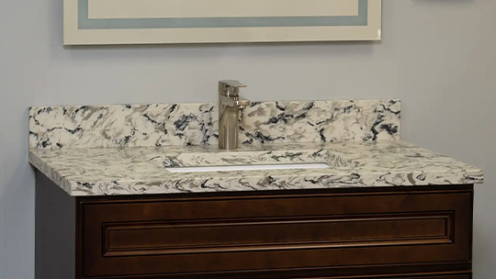
- Lily Ann stocks quartz vanity tops in 31", 37" and 49" widths, all 22" deep with an undermount single sink — sized to sit on standard 30", 36" and 48" vanity cabinets.
Yes, You Can Replace Just the Top
A vanity top is not built into the cabinet. It sits on top of the box and is normally held down with silicone adhesive and caulked at the wall — occasionally with a few clips or screws through corner blocks. Removing one is a controlled job, not demolition, and a cabinet in good condition can carry a new top for another twenty years.
This is worth knowing because the cabinet is usually the part that is still fine. Doors and drawers wear slowly; a top gets stained, chipped, etched or simply looks dated, and it is the part your eye lands on. Replacing it is a fraction of the disruption of a full vanity swap and none of the plumbing relocation risk.
The sequence:
- Shut off both supply valves and open the faucet to release pressure.
- Disconnect the supply lines and the P-trap. Have a bucket ready — the trap holds water.
- Cut every caulk line with a utility knife: at the wall, at any backsplash, and where the top meets the cabinet. Missing one is how cabinet edges get torn.
- Check for clips or screws from underneath, inside the cabinet's top corners.
- Lift the top straight up. Stone tops are heavy and awkward and need two people. If it resists, there is more caulk somewhere.
- Clean the cabinet's top edge back to bare, level material before setting the new top.
The two things that go wrong are both avoidable: prying instead of cutting the caulk, which damages the cabinet edge, and discovering mid-job that the old shut-off valves do not hold. Test the valves the day before.
The Two Measurements That Decide Everything
A replacement vanity top has to match two things: the footprint of the cabinet underneath, and the faucet hole configuration of the faucet you intend to use. Get either wrong and the top is not adjustable — it is a new order.
Measure the cabinet, not the old top
Measure the cabinet box: width, and depth front to back. If a toilet sits beside the vanity, measure how far it sticks out as well; our guide to round and elongated toilets shows how much floor each bowl shape needs. Then check what overhang the new top is specified with. Most tops overhang the cabinet slightly at the front and at any exposed end, which is why a 31-inch top suits a 30-inch cabinet. Measuring the old top and ordering that number reproduces whatever the last person got wrong.
If the top runs wall to wall, measure the opening in three places — at the back, in the middle, and at the front edge. Walls converge. The smallest of the three is the number the top has to clear.
Match the faucet holes
Pre-drilled tops come in three common configurations, and they are not interchangeable:
- Single hole — one hole for a single-lever faucet.
- 4-inch centreset — three holes, 4 inches between the outer two.
- 8-inch widespread — three holes, 8 inches between the outer two, for a separate spout and handles.
Decide the faucet before you order the top, not after. A top drilled for a centreset faucet will not take a widespread one, and the reverse leaves you with visible open holes.
The way out of this is an undermount top, which is supplied with the bowl already fitted and drilled for the configuration stated on the listing — so the two decisions collapse into one choice. That is what Lily Ann's quartz vanity tops are: undermount single-sink units in 31×22, 37×22 and 49×22, which drop onto standard 30-inch, 36-inch and 48-inch vanity cabinets.
The Materials, Ranked by What They Actually Cost You
In a bathroom the deciding factor is not hardness, it is acid resistance and porosity. Toothpaste, mouthwash, nail-varnish remover, hair products and most bathroom cleaners are either acidic or solvent-based, and they land on a vanity top daily. That single fact reorders the usual countertop rankings.
| Material | Sealing | Acid / stain risk | Best for |
|---|---|---|---|
| Quartz (engineered) | None | Very low — non-porous | The default. Family bathrooms, rentals, anywhere nobody will maintain it |
| Granite | Periodic | Low if sealed; stains if not | People who want natural stone and will re-seal it |
| Marble | Frequent | High — etches permanently from acid | Guest and powder rooms only, and only if you accept patina |
| Solid surface | None | Low; scratches, but sands out | Seamless integrated bowls, curved runs, repairability |
| Cultured marble | None | Low; can dull and yellow with age | Budget-led jobs, integrated bowl and backsplash in one piece |
| Laminate | None | Low surface risk; edges swell if water gets in | Powder rooms, temporary fixes, tight budgets |
| Wood / butcher block | Regular oiling | High around a basin | Vessel-sink setups where water never sits on the surface |
| Concrete | Regular | Moderate; hairline cracking is normal | A deliberate industrial look, accepting the character |
| Tile | Grout sealing | Grout is the weak point | Period restorations, DIY-friendly, awkward shapes |
| Stainless steel | None | Very low; shows every water spot | Commercial and utility spaces |
Why quartz is the honest default
Engineered quartz is ground natural quartz bound in resin. The resin closes the pores, which is the whole point: nothing soaks in, nothing needs sealing, and the acids that live in a bathroom cabinet cannot etch it. It is the surface that asks the least of the person who owns it, which in a bathroom matters more than in a kitchen because bathroom surfaces get wiped in a hurry, not maintained.
Why marble is riskier here than anywhere else
Marble is calcium carbonate. Acid dissolves it on contact, leaving a dull mark that is not a stain and does not clean off — the surface is physically gone. In a kitchen the acids are lemon and vinegar, occasionally. In a bathroom they are toothpaste and mouthwash, twice a day, on the same six inches of surface. Marble in a family bathroom will etch. In a powder room used a few times a week, or for someone who genuinely likes patina, it remains a beautiful choice — but it should be a decision, not a default.
The cost question, answered honestly
We do not publish price ranges for surfaces we do not fabricate, and you should be wary of any page that gives you a national average as though it were a quote. What is reliable is the ordering, which barely changes by region: laminate and cultured marble at the bottom, tile and solid surface in the middle, quartz and granite above them, and marble and specialist concrete at the top. Two things move a real quote far more than the material does — whether the top needs templating and fabrication as a separate trade visit, and whether the old top's removal is included.

Matching the Top to the Cabinet
The reliable approach is contrast in tone and agreement in undertone. A light top over a dark cabinet, or a dark top over a light cabinet, reads as deliberate. What fails is two surfaces that are nearly the same colour but not quite, or a warm-toned stone over a cool-toned cabinet.
Combinations that hold up, using real finishes:
- White quartz over a wood cabinet. The most forgiving pairing there is. Works over York Saddle, Charleston Cherry or Hickory Shaker, and it is what makes a wood vanity read as furniture rather than as brown.
- White quartz over a deep painted cabinet. Navy Blue Shaker or Shaker Espresso with a light top is the highest-contrast, lowest-risk combination in a small bathroom.
- Veined quartz over a plain white cabinet. When the cabinet is Colorado White Shaker or similar, the top is the only place pattern can come from. This is where a Carrara-look quartz earns its place — the marble appearance without the etching.
- Warm-toned top over a linen or off-white cabinet. Bristol Linen and York Linen are warm, so a cool grey top fights them. Keep the undertones on the same side.
One practical note that outranks all of the above: check the pairing under your own bathroom's light, at night, with the light you actually use. Bathroom lighting is more variable than kitchen lighting and it moves stone colour considerably.
Backsplash: Attached, Separate or None
Three options, and the choice is more consequential than it looks:
- Integral backsplash — part of the top, usually 3 to 4 inches high. Simplest to install and the easiest joint to keep watertight, because there is no seam where the two meet.
- Separate matching backsplash — a strip of the same material, siliconed to the wall. Same look, one more joint to maintain.
- Tiled or no backsplash — the current preference in a lot of design work, and it looks clean, but it puts the whole burden on the caulk line at the wall. Fine with a wall finish that tolerates water; a problem with plain painted drywall behind a busy family basin.
If the vanity is the main basin in a household with children, take the integral backsplash. It is the least glamorous option and the one that stays intact.
Common Mistakes
- Ordering to the old top's dimensions. Measure the cabinet.
- Choosing the faucet after the top. The hole spacing is fixed once the top is drilled.
- Putting marble in a family bathroom. It will etch. This is chemistry, not maintenance.
- Skipping the sealing of a cut edge. Any site cut — a plumbing notch, a resized backsplash — exposes raw material and needs sealing.
- Not levelling the cabinet first. A stone top on an out-of-level cabinet bears on two points instead of four, and stone under point load cracks.
- Forgetting the top is heavy. A 49-inch quartz top is a two-person lift and a stress test for an old cabinet that is only screwed to drywall.
If You Are Replacing the Cabinet Too
Sometimes the cabinet is not worth keeping — a swollen base, doors that will not hang true, or a layout that never worked. In that case buy the cabinet and the top together so the dimensions are settled once. Our guide to RTA bathroom vanity sizes and install time covers the module widths and the sequence, and custom bathroom vanity: when you need one covers the case where nothing standard fits.
To see the range, browse bathroom vanities, the quartz tops, sinks and faucets range, or the wider bathroom products section.










Comments