


subscribe to our Newsletter
Lily Ann Cabinets Assembly 101


Kitchen cabinet assembly can be difficult if you don’t have the right instructions. Luckily Lily Ann Cabinets has you covered! Here is your step by step guide to assembling your new kitchen cabinets that don’t require any special tools or skills to assemble!
Dovetail Wall Cabinet

The first design we will be discussing is the Dovetail wall cabinet.
Materials Needed:
- Cordless Drill
- Wood Glue
- Written Instructions
- Hardware provided by Lily Ann Cabinets
Assembly Process:
- Lay a protection layer on your work station.
- Place the cabinet face down on top of the protected layer. Be careful not to scratch the cabinet frame.
- Apply wood glue to the face frame grooves. Use wood glue in as many places as you can to make sure that your cabinet is as secure as possible.
- Slide the slides into place using the grooves.
- Apply glue to the grooves at the bottom and top of the cabinet.
- Slide the bottom and top down into place.
- To attach the back of the cabinet, glue the edges of the sides of the back panel.
- Slide the back panel into place.
- Secure the back panel into place with four long screws into the pre-drilled holes.
- Locate the metal brackets then place and secure using three screws into the corners of the top of the cabinet.
- To install shelves, locate cabinet shelf clips and palace them at the height you desire.
- Place the shelf within the shelf clips. You can adjust both shelf easily by simply moving the shelf clips.
- Find the neoprene door bumpers and attach them to the inside of the cabinet door.
Dovetail Base Cabinet

The second design we will be covering is the Dovetail base cabinet.
Materials Needed:
- Cordless Drill
- Wood Glue
- Written Instructions
- Hardware provided by Lily Ann Cabinets
Assembly Process:
- Lay a protection layer on your work station.
- Place the cabinet face down on top of the protected layer. Be careful not to scratch the cabinet door.
- Apply wood glue in the grooves of the cabinet sides. Use wood glue in as many places as you can to make sure that your cabinet is as secure as possible.
- Attach the cabinet sides. Both sides are the same and can be attached in any order. Make sure that all natural finish with UV top coats are facing inside and that all color finish sides are facing outwards.
- Apply woodglue in the grooves at the bottom and sides of the cabinet.
- Slide the bottom into place.
- Apply glue in the grooves in the side and the bottom.
- Slide the back into place.
- Attach one corner brace into each of the four corners using four screws each.
- Flip the cabinet upslide down to attach the toe kick.
- Glue the sides of the toe kick.
- Slide it into place.
- Secure it using two clips and four screws each.
- Glue the sides of the back support.
- Fasten with two clips and four screws each.
- Flip the cabinet back over to attach the cabinet glides.
- Use the pre-drilled holes to attach the metal glide clips in the correct positions.
- Slide the glides into place.
- Fasten a screw to the front of each glide to the face frame.
- To create the drawer, attach glue to each dovetail.
- Connect the front, one of the sides, and the back together.
- Slide the bottom of the drawer into the grooves on the front, side and back.
- Attach the final side.
- Repeat the steps to create the second dovetail drawer.
- Flip the drawer box upside down.
- Attach the two drawer clips using two screw each. Do this for both drawers.
- Slide the drawers into place and connect them to the glides. They will click together when fastened.
- Put the drawer and door bumpers on the bottom of the door and drawer.
- Place cabinet shelf clips in the places your desire and install the shelves.
Metal Clips for Base Cabinets
The second design we will cover using metal clips for base cabinets.
Materials Needed:
- Cordless Drill
- Wood Glue
- Written Instructions
- Hardware provided by Lily Ann Cabinets
Assembly Process:
- Lay a protection layer on your work station.
- Place the cabinet face down on top of the protected layer. Be careful not to scratch the cabinet door.
- Locate and attach the six metal L brackets using the screw provided.
- Place wood glue in the grooves on the cabinet sides. Use wood glue in as many places as you can to make sure that your cabinet is as secure as possible.
- Attach the cabinet sides. Both sides are the same and can be attached in any order.
- Secure the cabinet sides into place using the metal L clips and the screws provided.
- Apply woodglue in the grooves at the bottom and sides of the cabinet.
- Slide the bottom into place. Make sure that all natural finish with UV top coats are facing inside and that all color finish sides are facing outwards.
- Screw in six metal bracket into the cabinet sides using the screws provided.
- Place the cabinet on its front side so it will be secured correctly.
- Glue the back edge of the bottom.
- Attach the back of the cabinet.
- Secure it with the second half of the brackets using the screws provided.
- Fasten the back of the cabient to the cabinet bottom with two long screws.
- Attach two metal clips for the toe kick and secure this with eight screws.
- Attach the toe kick to the bottom of the front cabinet.
- Locate the corner braces and secure them on the top four corners using two small screws.
- Attach two drawer glide clips while the cabinet is on its backside.
- Attach the glides to the baseframe and to the clips. Secure them using screws.
- Apply glue to each dovetail.
- Connect the front, one of the sides, and the back together.
- Slide the bottom of the drawer into the grooves on the front, side and back.
- Attach the final side.
- Flip the drawer box upside down.
- Attach the door glides using four screws.
- Slide the drawer into the cabinet.
- Place cabinet shelf clips in the places your desire and install the shelves.
- Put the drawer and door bumpers on the bottom of the door and drawer.
Metal Clips for Wall Cabinets
We will now be working on metal clips for wall cabinets.
Materials Needed:
- Cordless Drill
- Wood Glue
- Written Instructions
- Hardware provided by Lily Ann Cabinets
Assembly Process:
- Lay a protection layer on your work station.
- Place the cabinet face down on top of the protected layer. Be careful not to scratch the cabinet door.
- Locate and attach the four metal L brackets with the screws provided.
- Place wood glue in grooves along the cabinet sides.
- Attach the cabinet sides. Both sides are the same and can be attached in any order.
- Secure the sides by using the female half of L clip to each cabinet side using screws.
- Apply glue in the grooves of the bottom and the sides.
- Slide the bottom into place.
- Apply wood glue in the grooves of the top and sides.
- Slide the top into place.
- Screw in four metal brackets into the back of the cabinet.
- Set the back of teh cabinet into place and screw them in from the inside of the cabinet.
- Tighten the female and male clips.
- Flip the cabinet back over to screw the longer screws that will help the back from bowing.
- To install shelves, locate cabinet shelf clips and palace them at the height you desire.
- Place the shelf within the shelf clips. You can adjust both shelf easily by simply moving the shelf clips.
- Find the neoprene door bumpers and attach them to the inside of the cabinet door.
Pull Out Waste Container
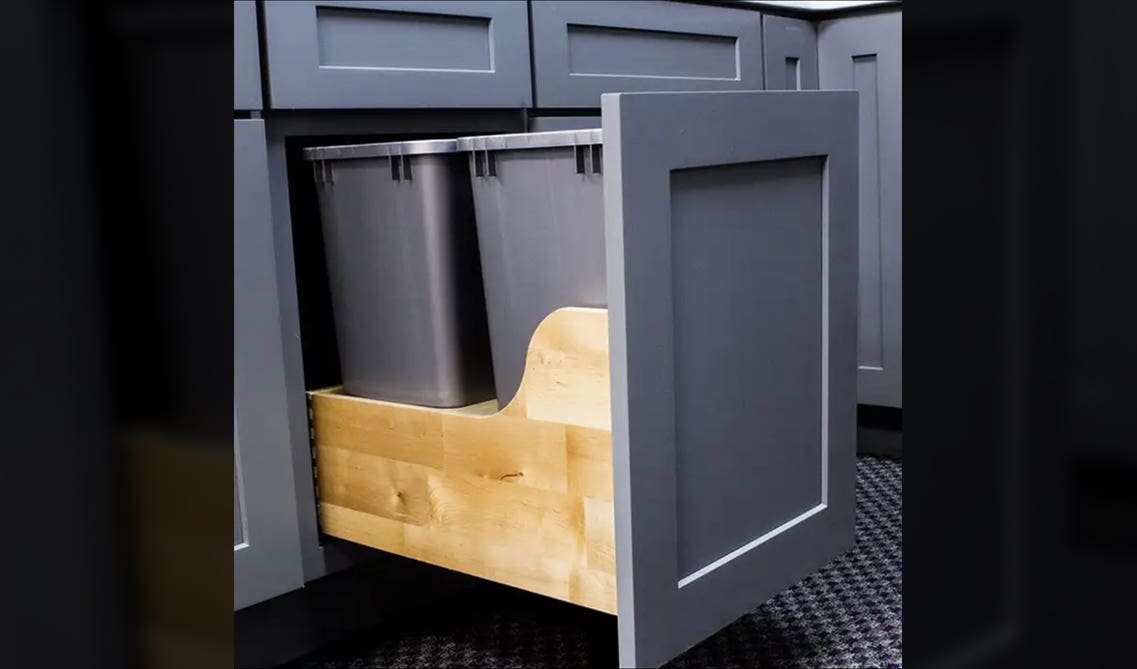
We will now discuss how to install a pull out waste container.
Materials needed:
- Phillips head screw driver
- A pencil
- A power drill with a 3/32 inch drill bit and a phillips head drill bit
- A posidrive bit or screw driver
- A tape measure
- Any kind of tape
- And an awl
- Installation template
Assembly Process:
- Install the slide skirts to the slides.
- Install the posidrive screws at the front of the slide. Make sure that the slide feet are facing inward.
- Using the screws provided install the main chassey to the slides.
- Install the crossbar to the rear of the frame.
- Measure your cabinet face and mark the center line.
- Place the included installation template inside your cabinet. The template should end where the back of your cabinet door with be.
- Secure the template using tape.
- Prepunch the screw locations using the awl.
- Using the 3/32 inch drill bit drill the eight pilot hole locations.
- Mount the waste container to the cabinet door.
- Attach the door brackets to the outside of the L brackets using the provided screws.
- Install the cabinet door by making sure the door brackets are lining up with the thick portion of your cabinet drawer.
- Measure from the base of the face frame up to each slotted hole location and record those dimensions.
- Measure the entire door opening and record that value.
- Measure the height of the cabinet door and record that value.
- Measure from the bottom of the door and transer those dimensions to the drawer.
- Predrill 3/32 inch pilot holes.
- Attach the cabinet door to the brackets while keeping the door as level as possible.
- Secure the brackets to the cabinet door using the provided wood screws.
- Adjust and align the drawer by loosening the cabinet bolts.
- Tighten the bolts when satisfied.
Soft Close Pullout

Now let’s install a soft close pullout.
Materials Needed:
- Phillips head screw driver
- Power drill with a 3/32 inch drill brit and a 11/32 inch drill bit
- Phillips head drill bit
- Awl
- Tape measure
- Adjustable wrench or ⅜ inch nut driver
- Tape
- Hammer
Assembly Process:
- Assembly the mounting straps and attach them into the bloom tandem slides.
- Place the included mounting template into the cabinet. The template should end where the back of your cabinet door with be.
- Attach this with tape.
- Prepunch the screw locations using the awl.
- Predrill the eight pilot holes using the 3/32 inch drill bit.
- Attach the slide assembly to the floor of the cabinet using eight of the numer six 1 inch flat head screws.
- Install the adjustable rub bushings in the face frame. For a 1 ½ inch face frame use the 11/32 inch drill bit to drill a pilot hole ¾ of an inch deep at the center of the face frame and at a height that will put the rub bushing at the center of the railing.
- Fully close the slides and put the pull out chassey into the cabinet. Push it all the way into the cabinet to engage the slides.
- Adjust the rear stop according to the cabinet height.
- Adhere the provided rubber bumpers at the top of the rear stop between the face frame and the stop.
- Secure the rear stop using the predrilled pilot holes and the two number six flat head screws.
- Loosen the four lock nuts that are inside the front wall of the unit using the wrench or the ⅜ inch nut driver.
- Pull the adjustable door mounting brackets to ensure you are mounting the thick portion of your cabinet drawer.
- Measure from the base of the face frame up to each AMB hole location and record those dimensions.
- Measure the entire door opening and record that value.
- Measure the entire height of the cabinet door.
- Measuring from the bottom of the door transer those dimensions to the door.
- Predrill 3/32 inch pilot holes.
- Attach the door with four of the number six half inch screws.
- Adjust the door skew by sliding the adjustable mounting brackets.
- Adjust the tilt of the door by using the 8 milimeter nuts and turning the T-Nut screws.
Cabinet Door with AMB Brackets
Our final assembly is the cabinet door with AMB brackets.
Materials Needed:
- Power drill with a 3/32 inch drill bit
- Tape measure
- Adjustable wrench or ⅜ inch nut driver
- Tape
- Door Mounting Bracket
- ½ inch screws
- 8 mm nuts
- T Screws
- Phillips head screwdriver
Assembly Process:
- Loosen the four lock nuts that are inside the front wall of the unit using the wrench or the ⅜ inch nut driver.
- Pull the adjustable door mounting brackets to ensure you are mounting the thick portion of your cabinet drawer.
- Measure from the base of the face frame up to each AMB hole location and record those dimensions.
- Measure the entire door opening and record that value.
- Measure the entire height of the cabinet door.
- Measuring from the bottom of the door transer those dimensions to the door.
- Predrill 3/32 inch pilot holes.
- Attach the door with four of the number six half inch screws.
- Adjust the door skew by sliding the adjustable mounting brackets.
- Adjust the tilt of the door by using the 8 milimeter nuts and turning the T-Nut screws.
While these tutorials and instructions make cabinet installation easy if you still need help there is no need to worry! Visit the Lily Ann Cabinets app to talk to a team member or use the BILT app for further tutorials.
For more information about affordable and reliable cabinetry visit Lily Ann Cabinets today!
Shop Related Cabinet Lines
Recent Blogs

Bathroom Cabinets,Bathroom Design,Bathroom Remodel
Single Sink Bathroom Vanity: Space-Saving Solutions for Your Bathroom

Cabinet Hardware
Smart Cabinet Hardware Ideas for Modern Living

Kitchen Cabinets,Buying Guide
Beware of the Unseen Expenses in Kitchen Cabinet Renovations: Key Considerations


25+ Ways To Style Grey Kitchen Cabinets August 1, 2019
18 Unique Modern Bathroom Ideas | Cabinets, Vanities + More October 22, 2019
11 Fresh Kitchen Backsplash Ideas for White Cabinets March 5, 2020


Comments