


Put knobs and pulls on the side opposite the hinges: in the bottom corner of wall cabinet doors and the top corner of base cabinet doors, about 2 to 3 inches in from each edge. On drawers, center the hardware left to right, and center it top to bottom unless the drawer is deep, then set it higher.
- Opposite the hinges, always. Hardware goes on the edge of the door that swings open.
- Low on wall cabinets, high on base cabinets — commonly about 2 to 3 inches in from the corner, so it ends up near countertop height.
- Shaker doors set their own position: center on the stile and line the pull up with the inner edge of the rail.
- Drawers: centered left to right, centered top to bottom on standard drawers, moved toward the top on deep ones.
- The 1/3 rule: a drawer pull about one-third as long as the drawer is wide — or two pulls once a drawer passes roughly 24 to 30 inches.
- Measure center to center, test with tape, drill with a template. Consistency matters more than the exact inch.
- Lily Ann sells knobs and pulls — each product page lists the center-to-center spacing you drill to.
Cabinet Hardware Placement at a Glance
Every standard placement comes back to one idea: put the hardware where your hand already goes. That means the side opposite the hinges on doors, low on cabinets you reach up to, high on cabinets you reach down to, and in the middle of drawers you pull straight out.
| Where | Knob | Pull |
|---|---|---|
| Wall (upper) cabinet door | Bottom corner, opposite the hinges, about 2–3 in from the bottom and side edges | Vertical, in the same bottom corner; the bottom end of the pull sits at the mark |
| Base (lower) cabinet door | Top corner, opposite the hinges, about 2–3 in from the top and side edges | Vertical, in the same top corner; the top end of the pull sits at the mark |
| Shaker (framed) door | Centered on the stile, level with the inner edge of the rail, or on the point where they meet | Centered on the stile; the end of the pull lines up with the inner edge of the rail and never runs onto it |
| Standard drawer | Centered left to right and top to bottom | Centered both ways; about 1/3 as long as the drawer is wide |
| Deep drawer | Centered left to right, moved up toward the top | Centered left to right, often 2–3 in down from the top edge |
| Wide drawer (past roughly 24–30 in) | Two knobs, spaced evenly | Two pulls, or one long pull centered |
These are common conventions that hardware makers and designers repeat, not building codes and not a Lily Ann specification. They exist because they suit most people's reach. If your kitchen has a reason to break one — a very tall pantry door, someone who needs hardware at a different height, a look you love — break it on purpose and do it the same way everywhere.

The Three Rules Every Placement Follows
Before any measuring, three rules decide where hardware goes. Get these right and the exact inch matters much less.
- Opposite the hinges. Hardware goes on the edge of the door that swings open. It sounds obvious, but on a run of mixed left- and right-hand doors it is the easiest mistake to make. If you are fitting or replacing doors too, our guide to cabinet hinge types covers the hinge side of the job.
- Low on wall cabinets, high on base cabinets. You reach up to open an upper cabinet, so its hardware sits in the bottom corner. You reach down to a base cabinet, so its hardware sits in the top corner. Either way the hardware ends up near countertop height, where your hand already is.
- The same spot on every matching piece. All wall-cabinet hardware the same distance from the bottom, all base-cabinet hardware the same distance from the top, all drawer pulls in the same position. Inconsistent placement is what people notice — far more than whether you chose 2 inches or 3.
Where to Put Knobs and Pulls on Cabinet Doors
On doors, the corner rule does most of the work: hardware goes in the corner opposite the hinges — the bottom corner on wall cabinets and the top corner on base cabinets. What changes is how you measure into that corner, and that depends on whether the door is framed, like a Shaker door, or flat.

Wall (upper) cabinet doors
Knobs sit in the bottom corner on the opening side, commonly about 2 to 3 inches up from the bottom edge and 2 to 3 inches in from the side. Pulls are usually mounted vertically in that same corner, with the bottom end of the pull at the mark rather than its center.
Base (lower) cabinet doors
The same logic, flipped: the top corner on the opening side, about 2 to 3 inches down from the top and in from the side. A vertical pull hangs down from that point, so the top end of the pull sits at the mark.
Shaker and other framed doors: let the frame decide
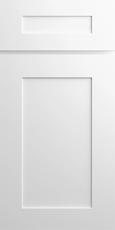
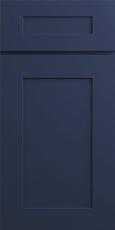
A Shaker door has a frame around a recessed center panel. The upright frame pieces are called stiles and the horizontal ones are rails. On these doors the frame gives you the position, so you barely need a tape measure:
- Pulls: center the pull on the stile, left to right, and line up its end with the inner edge of the rail. The pull should not run onto the rail itself.
- Knobs: center the knob on the stile, either level with the inner edge of the rail for a cleaner, updated look, or on the point where the stile and rail meet for a traditional one.
This is why Shaker cabinets are forgiving: the door shows you where the hardware goes. For the style side — which knobs and pulls suit a Shaker door in the first place — see our Shaker cabinet hardware styles.
Slab (flat) doors: equal distance from the corner
A slab door has no frame to line up with, so the convention is equal distance from the two edges that meet at the corner — commonly about 2 inches from both. For a pull, it is the end of the pull that sits at that point, not its center and not the screw hole, so the screw holes land slightly further in. The measuring section below shows how to work that out.
Where to Put Pulls on Drawers
Drawer hardware is centered left to right on almost every drawer. The real decision is height: centered top to bottom on a standard drawer, and moved up toward the top on a deep one, where a centered pull sits too low to grab comfortably.

- Standard drawers — the shallow top drawer on a base cabinet, for example: center the knob or pull both ways.
- Deep drawers — pot drawers and the lower drawers in a stack: keep the hardware centered left to right, but move it up, commonly about 2 to 3 inches down from the top edge.
- Shaker drawer fronts: center the hardware within the recessed panel, or on the top rail if you want it higher and easier to reach.
Stacked drawers: pick one approach and repeat it
A bank of three or four drawers of different heights has two accepted layouts:
- Centered on each drawer. Every pull sits in the middle of its own drawer face. Because the drawers are different heights, the gaps between the pulls are uneven — that is expected, and it reads as calm and traditional.
- The same distance from the top of every drawer. Every pull sits, say, 2 to 3 inches below the top edge of its drawer. It reads cleaner and more modern, and it puts the pull where you grab on every drawer.
Both are correct. Mixing the two in one kitchen is the thing to avoid.
Wide drawers: one long pull or two shorter ones
Once a drawer gets past roughly 24 to 30 inches wide, many designers switch to two pulls, or use one long pull centered across it. If you use two, there are two common ways to space them: centered on the lines that divide the drawer into thirds, or further out, toward the quarter points. Either looks deliberate. What matters is using the same method on every wide drawer in the room.
What Is the 1/3 Rule for Cabinet Hardware?
The 1/3 rule says a drawer pull looks best when it is about one-third as long as the drawer is wide. A 12-inch drawer suits a pull of about 4 inches, a 15-inch drawer about 5 inches, and a 30-inch drawer about 10 inches — or two shorter pulls instead.
| Drawer width | 1/3 of the width | What people usually do |
|---|---|---|
| 12 in | 4 in | One pull about 4 in long, or a knob |
| 15 in | 5 in | One pull about 5 in long |
| 18 in | 6 in | One pull about 6 in long |
| 24 in | 8 in | One pull about 8 in long, or two smaller pulls |
| 30 in | 10 in | One pull about 10 in long, or two pulls spaced as above |
| 36 in | 12 in | One pull about 12 in long, or two pulls |
Three things worth knowing about the rule:
- It is a drawer rule. Door pulls are chosen for the look you want and the height of the door, not its width.
- It is a starting point, not a law. Modern kitchens often go longer on purpose — pulls running two-thirds of the drawer or more — to stretch the horizontal line.
- It is about what you see. Use the pull's overall length for the 1/3 check, and its center-to-center spacing for drilling (next section).
You will occasionally see "the 1/3 rule" used for height instead — a pull set a third of the way up a drawer front. That is a different idea. When most people ask about the 1/3 rule, they mean length. If you would rather work from ranges than a single number, our guide to choosing cabinet hardware has a size chart by drawer width.
How to Measure for Cabinet Hardware
Measure pulls center to center: the distance from the middle of one screw hole to the middle of the other. That number, not the pull's overall length, decides whether a pull fits existing holes and where you drill new ones.
Every pull has two lengths:
- Overall length — end to end, what you see on the door.
- Center-to-center — between the screw holes, what the drill cares about. It is often listed in millimeters.
A real example from our own range: the Black Contemporary Metal Pull 12-3/4 in is 325 mm long overall, with its screw holes 305 mm apart. That leaves 10 mm of bar past each hole: (325 − 305) ÷ 2.
That overhang is why the slab-door rule puts the end of the pull at your 2-inch mark: the first screw hole then sits further in by exactly the overhang. Work it out once per pull size and write it on your template.
Replacing hardware? Match the holes first
If you are swapping pulls on existing cabinets, measure the center-to-center spacing of the old holes before you shop. A new pull with the same spacing goes straight in. A different spacing means filling the old holes and drilling new ones — a bigger job on a painted or stained door, because the filled holes can show.
Knobs
A knob mounts on a single screw, so there is no spacing to match; placement is only about where its center sits. Do check how far it sticks out — its projection — if the knob sits close to a wall, an appliance or a neighboring door.
How to Measure and Drill: Step by Step
Decide your rule for each cabinet type, test it with tape before drilling, then use a template or jig so every hole lands in the same place. The template is the difference between one good door and a whole kitchen that lines up.
- Write down your rules. One line each for wall doors, base doors, standard drawers, deep drawers and wide drawers — for example, “base doors: top corner, 2-1/2 in from the top and side.”
- Test before you drill. Cut painter's tape or masking tape to the size of each knob or the full length of each pull, stick it where the hardware will go, and look at the whole wall from across the room. Mounting putty does the same job with the real hardware. Tape comes off; holes do not.
- Use a template or jig. A cabinet hardware template or jig holds your measurements, so you set it once and drill every matching door and drawer the same way. You can buy one or make one cut to your own numbers. Measuring each door by hand is where small differences creep in.
- Mark, then check again. Mark each hole with a sharp pencil and double-check it before drilling — especially that you are on the side opposite the hinges.
- Check the run, not just the door. Before drilling a whole row, hold a level or straight edge across the marks. All the wall-cabinet marks should sit in one line, and all the base-cabinet marks in another.
- Drill one, fit it, then do the rest. Drill straight and square, fit the first piece of hardware, and confirm it looks right before repeating. Clamping a scrap block behind the door where the bit comes out helps stop the wood splintering.
Two checks before you start: some doors and drawer fronts come pre-drilled, so look for existing holes first; and make sure the screws supplied with your hardware suit the thickness of your doors.
Common Hardware Placement Mistakes
- Hardware on the hinge side. Most likely on a run where left- and right-hand doors alternate. Mark the opening edge of every door before you start.
- Heights that drift. Each cabinet looks fine on its own and the kitchen looks wrong as a whole. A template fixes this.
- Pulls running onto a Shaker rail. Line the end of the pull up with the inner edge of the rail instead.
- Measuring to the screw hole instead of the pull. On slab doors, measure to the end of the pull, then work in to the hole.
- Too high or too low to reach. Hardware that looks balanced but is awkward to grab has missed the point of the rules.
- Drilling before testing. Ten minutes with tape is cheaper than filling holes.
Where to Go Next in Our Hardware Guides
This page covers where hardware goes and how to measure for it. Choosing the hardware itself — style, finish, knobs or pulls — is covered in our other guides.
- Knobs or pulls? How to choose knobs and pulls for kitchen cabinets
- Matching your kitchen's style: how to match cabinet hardware with kitchen decor
- Modern kitchens: choosing cabinet handles for a modern kitchen
- Finishes: mixing and matching hardware finishes
When you are ready to buy, Lily Ann sells cabinet knobs and pulls alongside our cabinets — 132 items in the category as of Sep 2026. Check the center-to-center spacing on the product page before you order.
The Short Version
Opposite the hinges. Low on wall cabinets, high on base cabinets, about 2 to 3 inches from the edges — or lined up with the frame on a Shaker door. Centered on drawers, a little higher on deep ones. Pulls about a third as long as the drawer is wide. Measure center to center, test with tape, drill with a template, and keep every matching piece in the same spot.








Comments